Thursday, December 29, 2016

To Die for Friday - Lawn Fawn Scalloped Treat Box Advent Calendar 2016

       Hello all. I hope you all had a wonderful Christmas!  I was so happy to get to spend Christmas with my family including my soon to be brother in law. It helped raise my spirits to talk somethings out with my mom and getting to see the look on the kids faces when they opened their gifts. I am look forward to a fresh new start in the new year. Things for me will be changing and I can only hope they will work out just how I want them. The last few months have been a real downer for me (and not just because my 80's childhood ideals have passed on) not sure if its the weather or the way my life has ended up but I am determined to change it for the better. Now I know that the end of the year is here and Christmas is over but I want to make sure I got this up before the ring of 2017.


      In the last couple of years we had been getting the girls advent calendars (mostly to help stop the youngest for bugging us everyday it tomorrow was Christmas lol) and  I wanted to do something a little different this year. Most of the ones we get a filled with chocolate and I thought it would be fun to make my own advent calendar and fill it with toys for the kids. When I saw the Scalloped Treat Box from Lawn Fawn I knew right away that was the box I was going to use. It would be a good size to fit just about anywhere in the house and it was not going be easy for the kids to peek inside with out us knowing. Now that I had the idea of what I was going to do I knew my biggest problem was going to be figuring out what to put in side. 

     I decided to have half the boxes in red and the other half green and the add the opposite color number to the boxes. I used Lawn Fawn Finley's 123's dies for the numbers and just cut them out of the scrap card stock left over from cutting out the boxes. Cutting out the boxes did not take as long as I thought it was going to since I had to cut out 48 pieces. But it was a little boring even though I was sitting in my living room watching some TV. By the time I was done my arm was still making the cranking motion any time I lifted it lol. Once the boxes where all die cut out I used some score tape to put the pieces together. 


     Once I had the boxes filled and put together I had to figure out the best place to put them. The only place that made any since to me was around the TV. I wanted to hang them on the wall but didn't think they would hold up well, if this went over well with the kids and the boxes held up I was hoping to do this next year too, but we don't have any other flat surface other then on the TV itself. This worked well to a point, the boxes stayed up there nicely facing the way you see them in the picture but the kids wanted to turn the with the number facing await to they could see it counting down. We had a few boxes fall behind the TV.

     Now I'm sure your wondering what I came up with to fill these cuties. I had realized that I needed to find something small that I can add two of in one box because I was not going to be making 48 boxes so each of my kids had their own set (love my kids but no lol). So after walking the toy aisles with my kids (in the hopes of getting a idea of what they would like most for Christmas) I decide to go with a mix Tsum Tsums and Shopkins. Both of my kids just love those and they are small enough that you can fit two in one box. Now I will say this is not a cheap advent calendar but I knew I would not need to fill their stockings and since the Tsum Tsums came in 3 to a pack or 9 in a pack I would be saving some money there instead of buying a ton of mystery ones (although thinking about that now that could be fun too) and shopkins you can either buy the mystery ones which come with 2 to 3 in a pack or you can get on of the big sets and save there. I bought a few of the mystery packs only because I was trying to go with a Tsum Tsum theme but they didn't have enough different packs. 

     The kids loved seeing what they could end up with and that there was a mix of two of their favorite little toys in there. I would call this advent calendar a huge win for me and can't wait to do it again next year (I might even start shopping for what will go inside now). I can see this being a new family tradition. I hope this give you guys some great ideas to make your own fun advent calendars. Thank you all for joining me and have a safe and HAPPY NEW YEAR!!!!!


Happy Crafting


Thursday, December 15, 2016

What What Wednesday - Wedding Card


     Hello all. I first want to start off by apologizing for this going up super late. Like I said in my update video I have just been in a real funk and even after I did the video I was just having a hard time getting back to my computer to edit it. I am hoping that once Christmas is over I will snap out of this funk and get right back into posting and making videos again. On to today's post.


     I made this card before we left on our vacation. Hubby was going to be heading out of town to a wedding for one of his very good friends and I knew that I would not have the time once we got back to make a card. When I saw the Happy Wedding stamp set from Lawn Fawn I knew right away this was the stamp set I wanted to use for this card. The two little birds just reminded me of the bride and groom so much. I wanted to incorporate the wedding colors into this card. Their colors are Cerulean and Mustard. I had used one of the sketch layouts that I had to help with the look of the card.

     I used one Spellbinders Small Scalloped circle dies and cut that out in black and then took a Die from the Spellbinders Small Circle set and cut it out using some scrap white paper. I then took the heart garland stamp and inked it up with Memento tuxedo black ink and then stamped it off 2 times on to some scratch paper and then stamped it the third time on to the white paper to make a beautiful background. I stamped the birds and the cake onto some 110 lbs cardstock using memento ink. I then took my copics that matched as close as possible to the wedding colors. I used C0 and C02 for the cake and for the birds with a little R20 for their cheeks and Y26 for their beak. I used the BG49 for the flower in her hair. I used R29 for the hearts on the cake and I used Y26 for the garland and BG49 (which matched the closest to the Cerulean color) for the cake stand. I then used the matching dies and cut everything out. I took some tombow and glues everything into place.

     I took some of the 110 lbs cardstock scrap and used BG49 to color it. I then took the sentiment and stamped that using memento ink. I wanted to add a little bit more or the Y26 to that card so I took some white pearls from my stash and colored them using the Y26 marker. 
     For the main panel I used some pattern paper from an old 4x6 paper pack that I have. Its called Just Married by Pebbles Inc. I just trimmed that down so there was a small white border. The card size is a side folding 4.25x5.5 card and the card base is 110 lbs cardstock. I added the sentiment to the card once I had the circles glued down and the panel was attached to the card base. I then just trimmed off anything that was hanging over. 

     For the inside of the card I used the to birds hugging  and colored them the same as the ones on the front of the card and die cut them out. I then took another one of the sentiments for the stamp set and stamped that out with memento ink. 
     That finished off this card. I really like how cute it turned out and I am really hoping the couple likes it and has a wonderful wedding. Thank you all for joining me and I will see you next time.

Happy Crafting

Friday, October 14, 2016

To die for Friday - Halloween Project #6 - Jack-O-Lantern Shaped Card

     Hello all and happy Friday to you. I am so excited it's Friday. The kids had no school yesterday and they have no school today and have been super helpful getting the house ready for you trip, an update video to come next week about that. This weekend we are finalizing all our plans and making sure everything is ready to go. I am so excited, I cant even tell you. Anyways lets get on with the project at hand. For today's project I thought it would be fun to take the pumpkin dies from Spellbinders and turn it into cut little Jack-o-lantern. 

     I used the largest die and cut out 3 of the pumpkins in the orange cardstock and then cut the stem out of some scrap brown cardstock. I wanted to give the pumpkin a little more of a pumpkin look so I took my E97 copic marker to add some lines to give the pumpkin more shape and depth. I also took the marker around the edge too. I took the colorless blender to lighten the lines some. I used my EK Success Large Jack-o-lantern face punch and punched out the face on one of the pumpkins. Then I trimmed off the stem of the pumpkin from the orange cardstock and then just glued the brown one in it place. I then took some black cardstock and trimmed it to fit right behind the face and glued it down. I then add one of the other pumpkin cut outs to the back to help hide all the lines and the other papers (make it nice an neat looking). 


     For the back panel I took the 3rd cut out and scored a line along the top. I used one of the sentiments from Amy R's Halloween Sentiments and stamped that with Memento Tuxedo Black ink. I used some strong tape to attached the back panel to the front panel.

     The card turned out great. I think this would make a great invitation for any Halloween party too. Thank you so much for joining me and I hope you all have a great weekend. Stay tuned for my next video and post.

Happy Crafting 

Wednesday, October 12, 2016

What What Wednesday - Halloween Project #5 - A Spooky Anniversary Card

     It's Wednesday again and that means it's time for another What What Wednesday post.  On Oct. 25th my husband and I will be celebrating 13 years of marriage. So I thought a Halloween themed card would be a great way to share my love for him. This turned out much better then I had thought it would. 


       I first planned out what I was going to do on my mini Misty tool. I use Lawn Fawn Claire's ABC's and then stamp out C.C. Designs Ghost Spooky. I stamped them with Memento Tuxedo Black Ink onto some 110 lbs cardstock. I used C2 and C0 for the ghosts. I then took YR04 and YR07 to color the word with a fade effect. 


      My card size is 4.25x4.25 (I seem to be on a small card making kick) and used 110 lbs cardstock for the card base. I cut some pattern paper from Doodlebugs Ghouls & Goodies 6x6 paper pad just smaller the card size so I could have a small black border. I then took one of the Stitched Squares from Lawn Fawn to die cut out the front panel. I use foam dots to pop up the panel and then added a few small Beetle Black Sprinkles in each corner. 


     For the inside of the card I wanted something that should how long we have (or will be when I give this to him) married. So for the top and bottom part of the sentiment I used Lawn Fawn's Quinn's 123's and Violet's ABC's, The middle part of the sentiment I took the Terror-ific part of another sentiment from Amy R's Halloween Sentiments. I use the same copic markers for the 13. I can't believe that we have been married for so long and I look forward to the next 13 years. Thank you all so much for joining me. I hope you all have a great rest of you week and see you next time.


Happy Crafting

Monday, October 10, 2016

Cut it out Monday - Halloween Project #4 - Family Tombstones

     The weekend went by way to fast. I need more weekend, where can I buy more? Oh well I guess I will go on about my day and share with you today's project. I came across this project on Cricut Design Space Make it Now Project. I did change things up just a bit. I made ones for each person in the house. I thought it would be a fun to have them up a decoration. The font I used was a system font off my computer. The girls saw these over the weekend and thought they were funny. I am really glad that I made these it will add just a little family touch to our Halloween decor. This was a super easy project that even little kids could handle.
Thank you all for joining me. Keep an eye out for my next video and blog post.

Happy Crafting

Friday, October 7, 2016

To die for Friday - Halloween Project #3 - Monster Size Love

     Happy Friday. I am so glad this week is over, it has been a crazy week for me. We celebrated our oldest birthday and my husbands work schedule has kinda gone back to normal. I am really looking forward to a nice family weekend. Lets get into today's project so we can all go about our day. This was a fun card to make. I used Lawn and doodlebug products for this card. 
     I started out with 110 lbs white cardstock (I really like using this weight cardstock for not only coloring but for card bases too it holds up well) my card base measuring out to be a 4.25x4.25 size card. I them used some scraps from Doodlebugs 6x6 paper pad Ghouls and Goodies and October 31st. I then stamped out the two little monsters from Lawn Fawns Monster Mash stamp set using Memento Tuxedo Black ink. For the hill I used paper from October 31st and the medium height Stitched Hillside Border die from Lawn Fawn. I used some black card stock from my scrap bin and the speech bubble die from Lawn Fawn. I took some Yeti ink form Lawn Fawn and stamped out the sentiment and glued everything in place on the card front.
     I wanted the little monster to match a bit so for the girl I gave her a bow that was die cut out from the same pattern paper as the little boy monster. I then gave her some pink cheeks using my R20 Copic marker. I then took a pen that I got from the $1 spot at Target and just colored in her bow for a little bit of sparkle. I then took one of the eyes from Doodlebugs Eerie Eyes and had it looking at her. I use Wild Rose ink from Lawn Fawn to do some second and third generation stamping of the little heart.
     For the inside of the card I took one of the other sentiments and the small monster and stamped them using Memento ink. I then took the other orange eye and gave that to this little guy and colored him green using the same pens.

     I had planned to make this an anniversary card but came up with something else for it. I think this does make a great card to give to anyone that might just need a little pick me up. Thank you all for joining me and I hope you all have a great day and a wonderful weekend.

Happy Crafting

Wednesday, October 5, 2016

What What Wednesday - Halloween Project #2 - Copic Coloring

     Happy Wednesday to you. I also want to say a big Happy Birthday to our oldest who turned 12 today. I cant believe how fast time has gone by. I also can't believe we have an almost teenager in the house. This should be a fun year right lol. Anyways how is everyone else's week going so far? I am so ready for the weekend we have no plans and all I plan to do is relax and hopefully craft a little too. But it's Wednesday and hubby could come home and tell me we have plans or something could come up but for now its nice to think about doing nothing.

     Anyways on to today's project. I thought it would be a nice change to just share the coloring of a few images and then show the finished card. I love how cute it turned out and even though I talked during the video it was still nice to just sit a color and not try to rush to get everything done in under 20 minutes. I talk about each of the images but they are all from C.C. Designs Night of Fright stamp set and the sentiment is from a retired Amy R stamp set called Ghostly Greetings. I used my spellbinders die Label 8 for both the background (which is from Doodlebugs Boos and Brews 6x6 paper pad) and the windows for each of the little monsters. 

     For this little guy I stamped him with Memento Tuxedo Black ink on to some scrap 110 lbs cardstock. I used C2 and C0 for his little wrappings and E25 and E27 for his skin.

     I stamped her using the same ink. I knew she was going to be going in the middle so I wanted to tie in the other colors into her so it all flows nicely. I used YR04 and YR07 for her dress and shoes. For her bow I used G03 and G05 and I used C9 for her ponytail holders. I colored her skin with E02 and E00. I left the decoration on her face white so it looked more like face paint. For the sentiment I just took my 1 inch circle punch to punch out this second generation stamped trick or treat. 

     For him I wanted his costume to look like its glowing green. So I used G03 and G05, I then took C6 and C9 so he bones would stand out more. I colored his skin using E34 and E31. once everything was colored and cut out I used my ATG for the background and the boys and glued them down to a side folding white card base. I then took some foam dots for the little girl and the sentiment and popped them on.

     For the in side I just kept it simple with this fun little happy haunting sentiment. I really love how this card turned out and cant wait to hear what you all think about it. Now it's off to take the birthday girl out to dinner then home for cake and presents. Have a good evening all and I'll see you next time.

Happy Crafting

Monday, October 3, 2016

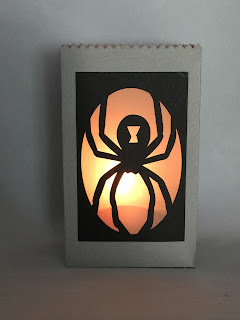
Cut it out Monday - Halloween Project #1 - Spider Lantern

     It's Monday and that means the start of a new week and the first (full) week of a new month. It also means another cut it out Monday project. But first how was your weekend? I hope you got everything done this weekend that you wanted to get done. I didn't have much because I knew hubby would be working on Sunday and he went to the UFC fights in Portland, so just a semi-laid back weekend for me. I have planned to do 13 Halloween themed project this month but I wont be getting that many done (details to come later) I might try and fit more then one into a video but we will have to see. Let get started with Halloween Project #1.
 
     I wanted something that could easily be done but didn't look like it was thrown together last minute. I have found as I get older I still love watching scary movies, especially anything about something being haunted (some I have a hard time watching even in daylight by myself) but I hate someone seeking up on me (like my youngest who I think is part ninja). The first scary movie I remember watching was with my dad and it was Arachnophobia (we are both hate spiders) and that one seemed to scare me more then anything this probably because they are a size I would expect to see in real life but it does not seem to stop me from watching it. Whats your scariest movie you have ever seen weather you still watch it or not? So when I saw this in the Make It Now section of Cricut Design Space I knew I had to make it for my craft room (again I am very strange lol). It is super simple and it looks great all lit up. I did use some vellum and my copic marker FYR1 Fluorescent Orange so it would have more of the orange glow. 

     Here it is not lit up and you can hardly tell that the vellum was colored. I really love the way it looks in my space and now I just need to go find some battery operated tea lights to put inside it (so I don't set fire to this or my house lol). 

     Thanks all for joining me. I hope you all have a great rest of your day and I'll see you back here for another spooky fun Halloween project. 

Happy Crafting

Friday, September 30, 2016

To die for Friday - Birthday Shaker Shaped Card

     Good Morning to you on this beautiful Friday. I hope you guys have some fun plans for the weekend. I don't have anything  going on really, Hubby has the UFC thing to go to on Saturday and if the weather is nice me and the kids will be doing some yard work. I also plan to do a little crafting but other then those things not a big busy weekend for us. My oldest birthday is coming up next week (she is turning 12) and I wanted to make her a fun card. So that's what this card is all about.

     I used all Lawn Fawn dies for this card. I used the largest circles from both the Stitched Circles and Stitched Circles Frames. I use the Stitched Circle to die cut my card base. This was a tough job only because I use 110 lbs cardstock for my base. It took a bit to get it to cut (I ran it through my machine a few times to make sure it cut all the way through) but it was worth it. It left a faint stitched impression on the inside of the card (I forgot to take a picture of it and I have already written inside the card). I then too the same die and cut out the background pattern paper which is from Doodlebugs 6x6 Sugar Shoppe paper pad. The Stitched Frames and the Happy Birthday sentiment is also cut from 110 lbs cardstock. For the sentiment I used my B06 copic marker to color it. I like the way it looks but now that I am looking at it in the picture I think white would have worked too. 
     I used the stitched circle die to also cut out a piece of transparency for the window and glued that onto the back the the frame. I use two layers of foam tape so I could really fill this with lots of these pretty confetti bits. They are Hearts and Stars in different colors I just cant remember where I got them. Once I had the amount I wanted in the center of the pattern paper I placed the frame onto and sealed it all up. 


     I then used my ATG tape runner to adhere the shaker to the card base. I really like who this turned out and I know my daughter will love it. Thank you all so much for going me and I will see you back here for the first Halloween project for the year. 

Happy Crafting

Wednesday, September 28, 2016

What What Wednesday - We R Memory Keepers Fuse Tool

     Good Morning to all my crafty friends. How are you on this fine day? I am having a pretty good morning. My oldest got up early this morning to head off to her first band practice. I got some good sleep so hopefully my day will move a long well. I am a bit behind in not only my house cleaning but in getting videos done so I am hoping to get caught up on these over the next few days and this weekend. Let us get to today's post. 

     I have had the fuse tool sitting here in my craft room for months still in the box and i thought it was time to use it. So I did a little review (or at least my thoughts on it) and share a small project along with it. I bought a pack of 100 Crayola Color Pencils to have with all my coloring books (I wanted some cheap color pencils for the coloring books easier to replace if lost or stolen by my kids lol) and wanted to have a color chart with them so I can see what the exact color will look like. But I knew that if I just left the paper in the pencil case then it would get all marked up so this is where the fuse tool comes in handy. 
     There are two zippers on this pencil case and each zipper opening holds 60 color pencil (30 per side) which means this case holds up to 120 colored pencils. I made these color charts using Cricut Design Space. Each side has 30 pencils and I have it set up so that this just flips over like a page in a book and all the colors line up to the places the pencils are.In the pack of color pencils I got there turned out to only really be 60 colors with 40 doubles (these are the colors they think get used the most) I keep the extras in the back zipper along with a few other colors that I picked up. I like having them sealed like this, it makes things easier to keep clean. I just wanted to show you these Now about the Fuse Tool.
     I was very impress with this tool. I not sure how long it took to heat up (I started it then went and got a few other things done while I waited) but once it was heated up it was not HOT. I could feel some heat if my hand was right over the tip but the handle was not hot and it did warm up the room (I was gone for about 15-30 minutes and sometimes having the heat gun on for 5 can warm up a room). I sealed things up nicely and the seal was cool to the touch with in seconds which is nice. I am so glad i finally got this and can see my self using it for all kinds of things. Thank you guys for joining me and I hope you have a great rest of your day and a wonderful week.

Happy Crafting


Friday, September 23, 2016

To die for Friday - Graduation Inspired Card

Welcome to another To die for Friday post. 
     I hope you have a good week or at least better then mine. I am so looking forward to this week being over its just has not been fun. I learned the hard way why you don't send clear stamp through your die cutting machine. Lesson learned and I will be keeping a better eye on my stamps that's for sure.

     Anyways lets get to today's card. I had planed to use the idea can to get the theme for this card since I had a stack of dies I want to use but could not decide which one or how. But once I had filmed me pulling the theme out I realized I for got to record so i put it back and turned on the camera and managed to pick the same theme. I then stopped the recording so I could get things ready to make the video and not sure what happened but the footage was not there when I went to check it. So I just filmed the card video and did not try to rerecord picking a theme since I liked the idea I had going through my mind. The theme was Graduation and that what I went with although you could use this for just about anything. 
     I used a lot of different dies for this card all Lawn Fawn. This is a kind of one layer card, everything was cut out of the gray background except for the star. I wanted that to look like it is shooting off the card. This is 110 lbs cardstock card base cut to 4.5x9 to make a top folding 4.5x4.5 square card and I went with a black white and gray color scheme with just a little pop of color. The dies I used was Lawn Fawn's Shooting Star, Simple Puffy Clouds, Stitched Square Frames and the stamps are from Lucky Stars. I stamped everything using my mini misty tool and Versafine Onyx Black ink. I used copic C5 (I think) to color the tail of the shooting star so it would stand out from the gray background. 
     I left the inside mostly empty so there is plenty of room to write a message but I did add and extra gold star that I had just to give the inside a little something. I am really happy with the way this card turned out (even if i did ruin the stamp I was planning on use). I think this would also work as a birthday card or even a card to just cheer someone up.I hope you all have a wonderful weekend and I will see you back here for another post on Monday.

Happy Crafting


Wednesday, September 21, 2016

What What Wednesday - My Inspirational Idea Cans

     Guess what day it is? Its Hump day and you know what that means. Only two more days until the weekend and another What What Wednesday post. I am looking forward to this weekend our youngest daughter is going to be doing her first Jiu Jitsu Competition on Saturday. She is super excited to do this to and we are very proud of her. 

     But enough about me and what i have going on lets dive into today's project. one of the other lady's I follow on YouTube share her idea can and how she plan to use it and I though that this would be a great idea to use thinks in your craft room might might not use as much. I took that idea it went a step farther. I sometimes struggle with coming up with card ideas (unless there is a specific reason to make a card or project) so I thought I would make two cans on for themes and one for products/embellishments to use. This not only will have me using things I may not have used in a long while but also get out of the routine of making the same kids of cards/projects that I have been so comfortable with. I happen to have some old cans sitting in my back room (well I had them for this exact reason) that would be perfect for my inspirational cans. 
     The tall one was a baby formula can and the other was an Almond Rocha can. I covered then in some cardstock that was in my scraps bin. I used some letters that I already had cut out from Lawn Fawns Capital and Lower Case ABC's Die. I used some Scotch Quick-Dry Glue for everything.

     I named this can Fun Ideas since it has all the themes in it from Baby Showers to Anniversary to Sympathy as well as seasons and Holidays (I am hoping to also start my scrapbooking back up which is part of the reason to have those in there too). I made it the small can since I don't think I will be adding to many more themes to this can. I just added a heart to the top and the front for just a little something.
     The taller can having all my extra goodies in it seemed fitting to call it Fun Extras because after all that's what you add to the cards and projects right a little something extra. I image I will be adding more projects in to it as I get more goodies so it seemed fitting to use the taller can. There is all kinds of stuff in this can. I have pieces of paper that say stamps only (which just means I am not using any dies with them), I have stamp companies names in there so I would only being using that companies product. Then there's the many different coloring medias I have as well as all the embellishments that I own. I even add the punch I have as well as the Spellbinder dies. I may pick out anywhere from 1 - 3 maybe more depending on how much I want to challenge myself. 
 
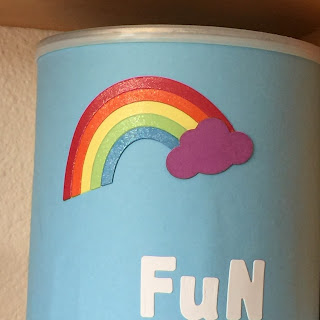
     The rainbow was left over pieces from a birthday banner I did two years ago for a friend's daughters first birthday. It was either from the Lawn Fawn Rainbow die or something I cut out with my Cricut (not sure which really). I also covered the top (forgot to take a picture of that) with some of the same blue and then just add some clouds. This helps cover the words on the lid so you wont have to see any of that if I have this in a film.
     This here is just showing you where I keep the cans. This is on a shelf right about my desk, in fact you can see the mount for my camera right there. So its easy to get to without having to get out of my chair which is nice because then I am more likely to use it if they are close at hand.

     I am hoping this will be just another fun way to making more projects and videos with out feeling stressed or rushing at the last minute to get some things done. Thank you for joining me and enjoy the rest of your Wednesday and week. Here is the link to the video of the lady who gave me the idea for these.

Happy Crafting
Monday, September 19, 2016

Cut it out Monday - "I'm Late" Birthday Card

Happy Monday!

     I hope you all had a fun weekend. Did you do anything crafty over the weekend? I sadly did not I also didn't get the yard work done like I wanted it rained all day Saturday and we had a few errands to finish up on Sunday.  Oh well maybe I will trying and get some stuff done this week if it not to cold and crappy out.

     Anyways I guess we should just dive right in to today's project. In my last Monday's post I shared the card I made for my husband. I might have mentioned that my mother in laws birthday was a couple of days before his and that I made her a card as well. I knew at the time of making this card it was not going to be getting to her in time. I wanted to make something that fits the belated birthday idea and thought about the white rabbit from Alice in Wonderland (cartoon version) and that that would be perfect. I let the kids pick which of the white rabbit images they like the best and this is the one they chose.
     He was not a simple card to out together but I think he turned out great. He is a shape card (the youngest wanted a pink card but I didn't like the pink around the rabbit so I just took the same piece I used to make the card base and cut one out in white. This also gives a little more strength to the card for mailing.  I thought I had taken a picture of the inside and I wanted to share what I wrote inside on the clock "We're Late, We're Late for a very important Birthday!" I really hope she likes it. Thanks for joining me and have a great Monday.

Happy Crafting


Friday, September 16, 2016

To die for Friday - Narwhal and Friends

Happy Friday!

     So any big plans for your weekend? Nothing big going on here just going to be doing some yard work before the weather gets to cold. I has been really nice this last week so I figured we should get some done to make things easier next year to get our yard looking good. I do hope you had a good week as well. 

     For today's die cut project I thought it would be fun to take a look at the new Narwhal and Friends die from Lawn Fawn. Its so cute and there are so many ways to use it. I had a lot of fun playing around with it. I cut everything out and then I keep every piece that came out of the dies to see just how far i can take this die. Here is a look at them all.

     Aren't they just the cutest little creatures ever, my kids wanted to play with them. I think these would be fun to have kids put together. 

     This one I just used two different shades of blue cardstock as well as some black for his face.

     Here I thought it would be fun to give him a little shadow. So I took the solid die cut and cut that out in black and then just off set it a little so it would have a small shadow. I cut him out of a pale purple color.
     This little guy I turned in to the narwhal. I wanted him to be white but have just a little color to him so I used first took the solid die cut piece in black and glued that in place and took the eyes that get cut out of the purple whale and just glued those inside but left his mouth black. Then I took the cheeks in purple along with the tummy and glued those in place. I thought about having a purple horn but then I thought how cute would it be if he had a to-tone horn. So i just cut along the score line so I knew it would fit and glued it in place. 
     For this one I wanted to turn him into a seal. I just took the solid black piece I then glued on the white snout and tummy. I thought it would be fun to see what he would look like with googly eyes too. I then add the hat to finish him off. 
     For this seal I gave him blue eyes a black tummy and use the piece that gets cut out of the snout to his face. Now while I was playing around with these little guys I had a thought.
     This could be used as a ghost. So that's what I did. I trimmed off on of the fins and then just stuck him to the blue card stock here just to see how it would look. I think he makes a very cute ghost and would be great for popping out of a house or something like that.

     I told you there are just so many fun ways you can use this die set. I hope you have as much fun with it as I did. Now enjoy your weekend and I'll see you back here for another project.

Happy Crafting


Wednesday, September 14, 2016

What What Wednesday - Krafts Inventory App review

Happy Wednesday all! 

     How has your week been going? I hope it's gone okay so far. I have been busy getting the house work done as well as getting some projects done and making a list of more projects I want to get done before the weather gets to cold. 

     I wanted to share with you guys an app I have been using for a while. I have been trying to find a way to keep my inventory of my crafty goodies on hand but a book was just not working anymore.  So I search the web and came across a video someone had posted about this app. I knew just by watching her use it this was what I had been looking for. I don't buy apps (mostly because I don't want to spend the money and then find out I don't like the app) but I figured that this was going to be worth the $2.99 (if I remember right that was the prices) even if it wasn't all I was hoping for. So I took the plunge and bought it and I just love it. I am still playing around with it and trying to get things in there that I don't want to buy doubles on or of things that I use the most and run out of so I can just have them marked in there and check anytime I am in a craft store to see if there is something I am out or or running low on that I need to replace. I love the idea of having this on my phone since my phone is always with me and I don't always think to update my book and put it back in my purse. not to mention on any kind of road trips this will be one less this to remember to pack.

     So if you are looking for a great way to keep track of your crafting goodies and want something that can easily go anywhere with you then check this app out. 


Happy Crafting

Monday, September 12, 2016

Cut it out Monday - Superman Symbol Birthday Card

     Hello all and welcome back. It is so good getting back to crafting and making videos. I have really missed it this summer. The kids are back in school which is nice and my house is cleaner then it has been in a long while. I am also getting back to filming more now that I seem to have more time. So lets jump right on in with today's card.

     I always seem to have a hard time finding (or even making) a card for my husband. He's not really a handy man (but he does do something like that around the house) so tool cards do really fit him and I can't always make a game controller card every year. So I try to think about all the things he is into and he is a big superhero fan and he has a rash guard that he likes to wear while doing Jiu Jitsu and its pink with the Superman Logo on it. I thought that would be a fitting card to make since his gift was going to be tickets to the UFC that's coming to Portland. 

     I made two different sizes because I could not make up my mind which size I liked better. I use the Superman cricut cartridge and found the matching colors in my cardstock stash. 
     This is a simple card to make I just took the back piece and made two copies of it. I then flipped one of them and welded it to the other piece to make my card base which I cut out in black. I then took the one remaining copy and made it a bit smaller so it would fit inside that card so there was a place to write. 
     I used the Happy Birthday Stamp from Lawn Fawns So Much to Say stamp set and it fit nicely inside the bigger card. 

     I really just love how simple this card is and easy to put together. Sometimes with my days simple is just want I need. Thank you all for joining me and look out for my next project. 


Happy Crafting


Monday, September 5, 2016

Life Update 2016

Good Afternoon all. Happy Monday and Labor day.

     How was everyone's summer? Mine seem to just blow by. once again July was the crazy month for me and i would really like it if it did not become a tradition next year lol. 

     Anyways I just want to give you guys an update as to where I was and what is to come not that school is starting. I am looking forward to it but sad that summer is over. 


Happy Crafting