Wednesday, November 11, 2015

Inspirational Wednesday - New Baby Card

Welcome to another Inspirational Wednesday post. 
Today's inspiration comes from many places. As I was paying bills (yuck not my favorite thing to do lol) I was updating my bill tracker (something I came up) and while looking for the file I came across my file for digital stamp images for The Greeting Farm. I decided to open it and see if I had a Thanksgivingy (i know not a real word or at least not spelled right) kind of image. I did not but I do have the Pregnant Anya one (I don't you can get this one anymore) and thought this would work instead.  I have a good friend that is going to be having her third baby. I also have this cute stamp that i have been wanting to use for a while and it works great for this too.  So those three things are what made up today's card.
I printed her out on to some copic quality paper (sized her about 2x3). I tried to color her to match my friend's hair color and skin color. I used N8 and 100 for her hair as well as shoes and E11 for her skin. I also used a little R20 for her cheeks and eye lids. I then took B02 and used a little for the top of her tummy bump, under her arms as well as for her under shirt. Then I took B000 to color the rest of her top and blend out the B02. For her pants I used G14 and some G17 for the shadow as well as for her hair band. I took a heart shaped enamel dot and used it where the little heart was in her hair. 
I have made my card base to be 4.25x4.25. I used my corner chomper to round the corners, I used the 1/8 side. The pattern paper is from Nana's Nursery Baby Boy paper pad.  She is pretty sure she is having a boy (she will know for sure in a month or so) since she is not 100% sure I thought these colors would work for a gender neutral card too. I timed it down just shy of 4.25 all around. I just used my ATG tape and stuck it in place after rounding the corn to match the card base. I then add my image to the bottom. I really wanted the paper to speak as the sentiment.
As for the inside I used this stamp that I got a long while ago on clearance at I believe Michaels. I thought this is such a great sentiment for any baby card and was really glad to be able to final use it. I stamped it with VersaFine ink.
This card is just so cute. I just cant get over how cute it looks. It's so simple and yet has so much beauty to it. Thanks for joining me today and I hope you have a wonder rest of your week.
Happy Crafting


Most of the supplies I used

Monday, November 9, 2015

Cut It Out Monday - Thanksgiving Day Place card

Happy Monday.
I hope everyone had a good weekend? I had a productive one even though I did not get everything done that I wanted to. But I did play around on the Cricut Design Space App on my iPad and came up with today's project.

Now I will say that when I was playing around I did not see that Cricut already had a Make It Now project for place cards. I did go in and look at that project and even though I have the subscription it still would have cost me $4.99 because of the type of font that they are using I don't have that one (I am trying not to spend any money this month). I decided to share with you the ones I came up with since everything in them are free.

I thought that this year I would do a little decorating for Thanksgiving since we will be having family over (and I am better prepared this year) and thought it would be fun if I made place cards for everyone, even though I know that they will not stay where I place them because someone is going to want to move to sit next to the grandparents or cousins what have you.
I think I might change the color of the paper when I make the rest but other wise this turned out nice. I really like the calligraphy pen too. It's the medium calligraphy pen from the multi pack of Cricut pens you can find at Joann's and Michaels. 
I cut it with the image on both sides but you can just have a solid circle in the back too.I cut a little off the bottom just to show that it can be done and sit flat but you don't have to. I have made this one 3 inches tall but you can make them any size you need.
Here is a look at it from the side.

Thank you for joining me and have a great rest of your day.
Happy Crafting


Wednesday, November 4, 2015

Inspirational Wednesday - Trip Jar Label

Happy Hump Day! The week is half over and the weekend is so close. For me though my weekend is a bit closer my girls have no school on Friday which of course means I can sleep in a bit. Which will be very helpful it was a rough night Monday not which of course slowed down my Tuesday which has effected my Wednesday. I don't like when that happens. 
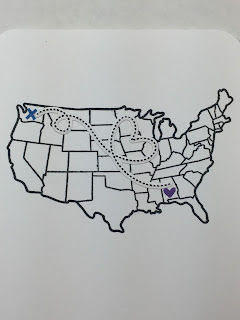
Anyways on to today's project. One of my best friends asked me to help her decorate a jar she is using to put money in to save up for a trip out to see her sister. As well as her soon to be new niece/nephew in about 9 months from now. This is what I came up with.

The paper I used is just some white card stock. I cut it down to be 1/2 an inch smaller all around then the measurements she gave me (8 x 4.5) so this measure out at 7.5" x 4". 
Then using Microsoft Word I just made a template the same size and typed out what I wanted it to say. Once I was happy with everything I just printed it out. I hand colored the letters with my copic markers. I am sorry I dont have the colors I used I put them away with out thinking and cant remember what their numbers are. I did used a purple for the top line, a blue green for the middle and yellow for the bottom.
 I then used Lawn Fawns Wish You Where Here stamp set for the States, stamped in memento tuxedo black ink as well as the x for my best friend which I stamped using memento Danbue Blue ink and the heart which is for her sister in memento grape jelly. I then took one of the stamps from Lawn Fawn Bugs and Kisses for the travel line. I liked it better die cut out then just stamping it straight on there. I then just used my 1/2 inch corner rounder to soften the edges. My friend now has something to help reminder why the money in the jar should not be touched.

Thank you all so much for joining me. I hope you have a wonderful Wednesday. 
Happy Crafting


Supplies


Monday, November 2, 2015

Cut It Out Monday - How to Download Sadness & Disgust

Happy Monday all.
I hope everyone had a good weekend. Mine could have been better but what can you do right. Oh well on to a new week and a new Cricut Project. Today's project was requested by my girls. They asked if I can make one of the characters from Inside Out. So i let them pick the ones they wanted and decided to do a How To video. This will show you where I got the file and how to upload them to the Cricut Design Space. So lets get started.

You first want to find the image that you want to cut out. Now you can just take an image off of your computer but today I am doing an .svg file. I found these images at Krafty Nook, there are a lot of great cut files on this site for free. I just typed in the search bar Inside Out and it came me all the post with that name in it. Once I got to the images I was looking for I had my girls pick out the characters they wanted. These are who they picked.
These files are easy to download as well as uploading them to Design Space. The best way for my to tell you how to do that is to show you in my video so please click on the video below to see how to download and upload.

Although Disgust turned out really cute I am not sure I would want to go to small for her thought I think you will loose some of the detail. She is 4 inches tall and as you can see on her belt that is a very small black piece. I did not even know it was there until I made her bigger. I used three different shades of green to make her, as well as some pink for her lips and scarf.
Sadness on the other hand was very easy to cut out and put together. I used three different shades of blue (all scraps as well) and black for her glasses. You could even go a step farther if you wanted and put plastic behind her glasses or fill them in with some glossy accents for the same effect. But I think she looks just as good as is. 

They have the other emotions on that site as well along with Bing-Bong. I would go and check out what other goodies this site has. I am very impressed with the files you can get there so far and I am not done looking yet.

I hope you all have a wonderful Monday and I will see you soon.
Happy Crafting