Friday, October 14, 2016

To die for Friday - Halloween Project #6 - Jack-O-Lantern Shaped Card

     Hello all and happy Friday to you. I am so excited it's Friday. The kids had no school yesterday and they have no school today and have been super helpful getting the house ready for you trip, an update video to come next week about that. This weekend we are finalizing all our plans and making sure everything is ready to go. I am so excited, I cant even tell you. Anyways lets get on with the project at hand. For today's project I thought it would be fun to take the pumpkin dies from Spellbinders and turn it into cut little Jack-o-lantern. 

     I used the largest die and cut out 3 of the pumpkins in the orange cardstock and then cut the stem out of some scrap brown cardstock. I wanted to give the pumpkin a little more of a pumpkin look so I took my E97 copic marker to add some lines to give the pumpkin more shape and depth. I also took the marker around the edge too. I took the colorless blender to lighten the lines some. I used my EK Success Large Jack-o-lantern face punch and punched out the face on one of the pumpkins. Then I trimmed off the stem of the pumpkin from the orange cardstock and then just glued the brown one in it place. I then took some black cardstock and trimmed it to fit right behind the face and glued it down. I then add one of the other pumpkin cut outs to the back to help hide all the lines and the other papers (make it nice an neat looking). 


     For the back panel I took the 3rd cut out and scored a line along the top. I used one of the sentiments from Amy R's Halloween Sentiments and stamped that with Memento Tuxedo Black ink. I used some strong tape to attached the back panel to the front panel.

     The card turned out great. I think this would make a great invitation for any Halloween party too. Thank you so much for joining me and I hope you all have a great weekend. Stay tuned for my next video and post.

Happy Crafting 

Wednesday, October 12, 2016

What What Wednesday - Halloween Project #5 - A Spooky Anniversary Card

     It's Wednesday again and that means it's time for another What What Wednesday post.  On Oct. 25th my husband and I will be celebrating 13 years of marriage. So I thought a Halloween themed card would be a great way to share my love for him. This turned out much better then I had thought it would. 


       I first planned out what I was going to do on my mini Misty tool. I use Lawn Fawn Claire's ABC's and then stamp out C.C. Designs Ghost Spooky. I stamped them with Memento Tuxedo Black Ink onto some 110 lbs cardstock. I used C2 and C0 for the ghosts. I then took YR04 and YR07 to color the word with a fade effect. 


      My card size is 4.25x4.25 (I seem to be on a small card making kick) and used 110 lbs cardstock for the card base. I cut some pattern paper from Doodlebugs Ghouls & Goodies 6x6 paper pad just smaller the card size so I could have a small black border. I then took one of the Stitched Squares from Lawn Fawn to die cut out the front panel. I use foam dots to pop up the panel and then added a few small Beetle Black Sprinkles in each corner. 


     For the inside of the card I wanted something that should how long we have (or will be when I give this to him) married. So for the top and bottom part of the sentiment I used Lawn Fawn's Quinn's 123's and Violet's ABC's, The middle part of the sentiment I took the Terror-ific part of another sentiment from Amy R's Halloween Sentiments. I use the same copic markers for the 13. I can't believe that we have been married for so long and I look forward to the next 13 years. Thank you all so much for joining me. I hope you all have a great rest of you week and see you next time.


Happy Crafting

Monday, October 10, 2016

Cut it out Monday - Halloween Project #4 - Family Tombstones

     The weekend went by way to fast. I need more weekend, where can I buy more? Oh well I guess I will go on about my day and share with you today's project. I came across this project on Cricut Design Space Make it Now Project. I did change things up just a bit. I made ones for each person in the house. I thought it would be a fun to have them up a decoration. The font I used was a system font off my computer. The girls saw these over the weekend and thought they were funny. I am really glad that I made these it will add just a little family touch to our Halloween decor. This was a super easy project that even little kids could handle.
Thank you all for joining me. Keep an eye out for my next video and blog post.

Happy Crafting

Friday, October 7, 2016

To die for Friday - Halloween Project #3 - Monster Size Love

     Happy Friday. I am so glad this week is over, it has been a crazy week for me. We celebrated our oldest birthday and my husbands work schedule has kinda gone back to normal. I am really looking forward to a nice family weekend. Lets get into today's project so we can all go about our day. This was a fun card to make. I used Lawn and doodlebug products for this card. 
     I started out with 110 lbs white cardstock (I really like using this weight cardstock for not only coloring but for card bases too it holds up well) my card base measuring out to be a 4.25x4.25 size card. I them used some scraps from Doodlebugs 6x6 paper pad Ghouls and Goodies and October 31st. I then stamped out the two little monsters from Lawn Fawns Monster Mash stamp set using Memento Tuxedo Black ink. For the hill I used paper from October 31st and the medium height Stitched Hillside Border die from Lawn Fawn. I used some black card stock from my scrap bin and the speech bubble die from Lawn Fawn. I took some Yeti ink form Lawn Fawn and stamped out the sentiment and glued everything in place on the card front.
     I wanted the little monster to match a bit so for the girl I gave her a bow that was die cut out from the same pattern paper as the little boy monster. I then gave her some pink cheeks using my R20 Copic marker. I then took a pen that I got from the $1 spot at Target and just colored in her bow for a little bit of sparkle. I then took one of the eyes from Doodlebugs Eerie Eyes and had it looking at her. I use Wild Rose ink from Lawn Fawn to do some second and third generation stamping of the little heart.
     For the inside of the card I took one of the other sentiments and the small monster and stamped them using Memento ink. I then took the other orange eye and gave that to this little guy and colored him green using the same pens.

     I had planned to make this an anniversary card but came up with something else for it. I think this does make a great card to give to anyone that might just need a little pick me up. Thank you all for joining me and I hope you all have a great day and a wonderful weekend.

Happy Crafting

Wednesday, October 5, 2016

What What Wednesday - Halloween Project #2 - Copic Coloring

     Happy Wednesday to you. I also want to say a big Happy Birthday to our oldest who turned 12 today. I cant believe how fast time has gone by. I also can't believe we have an almost teenager in the house. This should be a fun year right lol. Anyways how is everyone else's week going so far? I am so ready for the weekend we have no plans and all I plan to do is relax and hopefully craft a little too. But it's Wednesday and hubby could come home and tell me we have plans or something could come up but for now its nice to think about doing nothing.

     Anyways on to today's project. I thought it would be a nice change to just share the coloring of a few images and then show the finished card. I love how cute it turned out and even though I talked during the video it was still nice to just sit a color and not try to rush to get everything done in under 20 minutes. I talk about each of the images but they are all from C.C. Designs Night of Fright stamp set and the sentiment is from a retired Amy R stamp set called Ghostly Greetings. I used my spellbinders die Label 8 for both the background (which is from Doodlebugs Boos and Brews 6x6 paper pad) and the windows for each of the little monsters. 

     For this little guy I stamped him with Memento Tuxedo Black ink on to some scrap 110 lbs cardstock. I used C2 and C0 for his little wrappings and E25 and E27 for his skin.

     I stamped her using the same ink. I knew she was going to be going in the middle so I wanted to tie in the other colors into her so it all flows nicely. I used YR04 and YR07 for her dress and shoes. For her bow I used G03 and G05 and I used C9 for her ponytail holders. I colored her skin with E02 and E00. I left the decoration on her face white so it looked more like face paint. For the sentiment I just took my 1 inch circle punch to punch out this second generation stamped trick or treat. 

     For him I wanted his costume to look like its glowing green. So I used G03 and G05, I then took C6 and C9 so he bones would stand out more. I colored his skin using E34 and E31. once everything was colored and cut out I used my ATG for the background and the boys and glued them down to a side folding white card base. I then took some foam dots for the little girl and the sentiment and popped them on.

     For the in side I just kept it simple with this fun little happy haunting sentiment. I really love how this card turned out and cant wait to hear what you all think about it. Now it's off to take the birthday girl out to dinner then home for cake and presents. Have a good evening all and I'll see you next time.

Happy Crafting

Monday, October 3, 2016

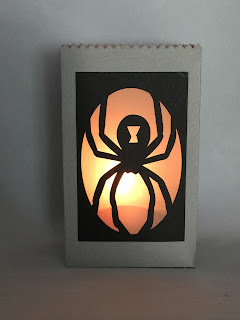
Cut it out Monday - Halloween Project #1 - Spider Lantern

     It's Monday and that means the start of a new week and the first (full) week of a new month. It also means another cut it out Monday project. But first how was your weekend? I hope you got everything done this weekend that you wanted to get done. I didn't have much because I knew hubby would be working on Sunday and he went to the UFC fights in Portland, so just a semi-laid back weekend for me. I have planned to do 13 Halloween themed project this month but I wont be getting that many done (details to come later) I might try and fit more then one into a video but we will have to see. Let get started with Halloween Project #1.
 
     I wanted something that could easily be done but didn't look like it was thrown together last minute. I have found as I get older I still love watching scary movies, especially anything about something being haunted (some I have a hard time watching even in daylight by myself) but I hate someone seeking up on me (like my youngest who I think is part ninja). The first scary movie I remember watching was with my dad and it was Arachnophobia (we are both hate spiders) and that one seemed to scare me more then anything this probably because they are a size I would expect to see in real life but it does not seem to stop me from watching it. Whats your scariest movie you have ever seen weather you still watch it or not? So when I saw this in the Make It Now section of Cricut Design Space I knew I had to make it for my craft room (again I am very strange lol). It is super simple and it looks great all lit up. I did use some vellum and my copic marker FYR1 Fluorescent Orange so it would have more of the orange glow. 

     Here it is not lit up and you can hardly tell that the vellum was colored. I really love the way it looks in my space and now I just need to go find some battery operated tea lights to put inside it (so I don't set fire to this or my house lol). 

     Thanks all for joining me. I hope you all have a great rest of your day and I'll see you back here for another spooky fun Halloween project. 

Happy Crafting